2. Server setup, configuration and maintenance
2.1. Introduction and general architecture
This file contains setup with docker. Many of the steps you may expect to setup a webstack are automatized. You can still look them up in the Dockerfile.
The setup instructions are divided into:
- common steps for all setups
- steps for local development
- steps only necessary on the production server
The following picture sketches the setup. Some notes:
- Deployment is done by logging in to the server via SSH and pulling the (production-)branch from the repository
- The python environment is configured the same locally and on the server.
- On the server a faster and more secure web server (nginx) is used instead of the Django development server
- Some secrets (config file with login information, secret keys) are not synchronized via the repository. This secrets also differ from the one used on development machines.

2.2. Setup basic tools
You must use git for code management and Docker for setup automation.
We use a standard Debian 8 on the server. On development machines, any operating system can be used in principle (we know that many Linux und Mac OS versions works). The instructions here are compiled for a Debian/Ubuntu installation.
First update your system:
sudo apt-get update
sudo apt-get upgrade
NOTE: Package names can deviate depending on your Linux distribution.
sudo apt-get install git mysql-client
We need Docker Community Edition (CE) and docker-compose. With prerequisites satisfied, it boils down to
sudo apt-get install docker-ce
sudo curl -L "https://github.com/docker/compose/releases/download/1.11.2/docker-compose-$(uname -s)-$(uname -m)" -o /usr/local/bin/docker-compose
sudo chmod +x /usr/local/bin/docker-compose
Start the docker daemon:
sudo service docker start
2.2.1. Setup basic tools with Fedora
The above instructions are basically the same with Fedora, except that you have have to use dnf instead of apt. Altogether, the following instructions install everything one needs:
sudo dnf update
sudo dnf install git mysql docker docker-compose
2.2.2. IDE
Install a local IDE. We highly recommend to use PyCharm. The full version has Django support and is free for educational purposes.
To get the educational version, go to PyCharm Student and fill out the form using an official @ethz.ch mail address. After completing, you will receive an e-mail from JetBrains with a link to confirm your request. If all works well, you will receive another e-mail with further instructions on how to set up a JetBrains user account.
Finally you can download PyCharm Professional Edition, extract it and place it somewhere you want. There is no installation required. To start the program run <YourPyCharmFolder>/bin/pycharm.sh.
Activation is easiest if you download the licence-file from your JetBrains account-page. When asked for activation, simply drag&drop the file into the activation-key textbox.
2.3. Setup local project folder
2.3.1. Pull files with git
Create a folder on your machine where you want to store the local copy of the repository. This could e.g. be in your home directory.
mkdir ~/Projects/<project home>
Now cd into the newly created folder
cd ~/Projects/<project home>
and execute the following commands to tell git that your local copy of the repository now lives in this folder.
git init
git remote add origin https://github.com/gitsimon/tq_website.git
git fetch
git checkout -t origin/master
If you want to work on your own branch, create it and check it out
git branch dev-<your name>
git checkout dev-<your name>
You can push it to the server and setup push/pull by
git push -u origin <branch>
It’s a good idea to rebase your branch on the master from time to time. While your branch is checked out, run:
git rebase master
Git is a powerful tool. Have a look at the official documentation, especially on branching.
2.3.2. Make helper scripts executable
Since file permissions are not synchronized with git, you have to make the helper scripts executable:
sudo chmod +x scripts/*
2.3.3. Initial Configuration
We have to create 2 files, that are not under version control, manually:
Create the maintenance file <project home>/maintenance.conf. You can use the provided template file and copy it with
cp configurations/maintenance-template.conf maintenance.conf
(Whenever doing maintenance on a live server, switch the flag in this file to 1 (and back again), and restart docker-compose to make nginx reload the config and display a maintenance message)
Create the secret environment file <project home>/.env. You can use the provided template file and copy it with
cp configurations/.env-template .env
This files are not under version control because it contains some secrets and machine dependent configurations and secrets.
Attention: The configured mail account is used to - depending on the action - send huge amounts of auto-generated mails. Leave the mail settings empty (as it is in the template) or configure a test mail server before starting a production-like docker configuration (which will actually send out mails!).
2.4. Let docker install all development dependencies
Note: In the current setup the docker-compose.yml is customized via environment variables. Due to escaping issues, this works only with the zsh shell which may not be standard on some unix based systems.
On development machine:
Run in the <project home> directory:
docker-compose build
It will fetch all required dependencies and install it for you.
Note: This can take some minutes
Note: If you encounter a problem because some ports are already in use, you can choose your preferred development ports in the .env-file.
In production environment (or to setup a production-like stack on development machine):
docker-compose -f docker-compose-production.yml build
Simulated production environment (to setup a production-like stack on development machine):
docker-compose -f docker-compose-production-no_ssl.yml build
2.5. Load test data into database
Get in touch with admin to get a backup of live database (with removed personal data). The backup can then be applied to the database with (while docker is running the containers)
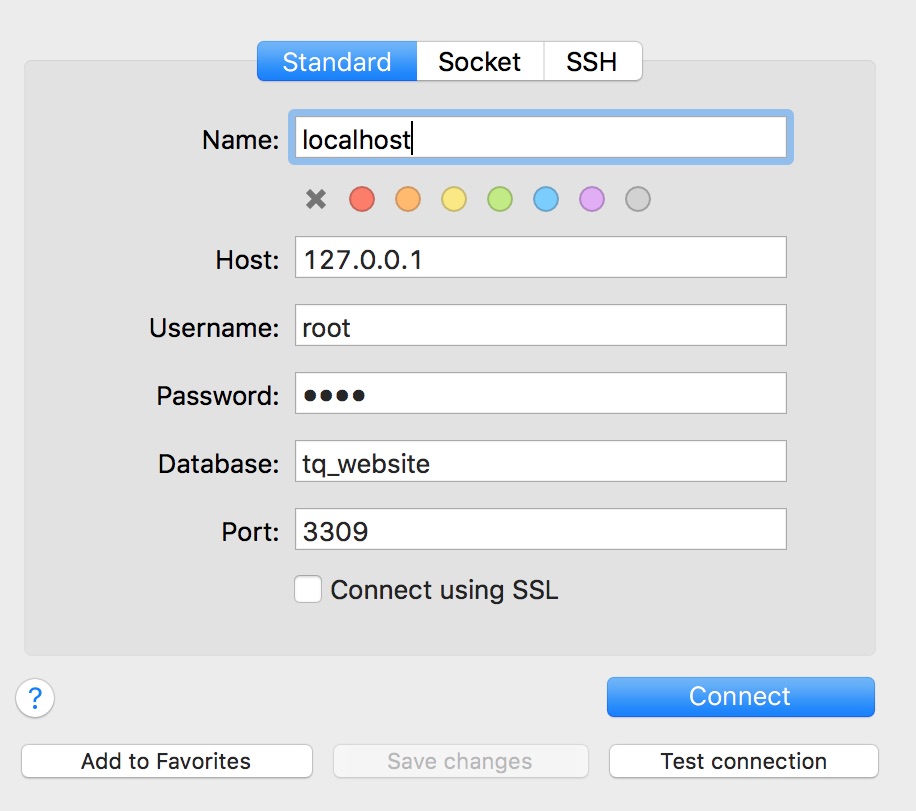
mysql -h 127.0.0.1 --port=3309 -u root -proot -t tq_website < database_dump.sql
2.6. Create super user
Create a superuser with your favorite name and password:
./scripts/create_superuser.sh
Note: This are the credentials to login anywhere on the frontend/backend.
Note: Even if the loaded database dump contains a user representing you you have to repeat that step since the dump has different salted passwords, so your password will be considered invalid.
2.7. Test the website locally
Whenever working on the project, run the following command in the <project home> directory primarily:
docker-compose up --build
While this command is running you should be able to view the local, full-stack website at this addresses:
localhost:8000or127.0.0.1:8000localhost:8001or127.0.0.1:8001(if you started with-f docker-compose-production-no_ssl.yml)
2.8. Setup on a Mac
If you have a Mac and prefer to use GUIs, the following tutorial gives an alternative way over the command line setup:
2.8.1. Download the necessary Software:
- Docker for Mac
- Download PyCharm - As a student, you can get a professional license for free
- Sequel Pro
2.8.2. Debugger
Open the pycharm settings
In the Settings / Preferences dialog go to Build, Execution, Deployment and then Docker
Click on + and then Apply
Go to Project: tq_website, then Project Interpreter and in the Drop Down Menu choose Show All
Click on the + and then Add Remote
In the Pop-Up, choose Docker-Compose
- Under Server, Docker should show up (only if you did steps 2. and 3. right)
- Configuration Files should show your docker-compose.yml file (if not, are you in the tq_website project?)
- Service should have Django
Apply and close, go back to the main editor. In the right upper corner click on the combo box reading tq_website, and then Edit Configurations
In the pop-up, with the tq_website configuration selected, choose Host to be 0.0.0.0
2.8.4. PyCharm
- On the main menu, choose File | Open.
- Select the directory that contains the desired source code (pulled from git repository).
- Click ok.